Friday, June 29, 2012

Collard Greens

I was talking to my brother Russell the other day on the phone. He lives in North Carolina and was saying I needed to come out on a visit. He started listing some of my favorite yummy Southern foods - fried okra, southern hot dogs, collard greens, fried chicken, hush puppies, etc. In the summer, John and I seem to BBQ a ton. Usually about once every three weeks or so, we make ribs and chicken. Instead of one of the boring side dishes I normally make, I decided to give collard greens a whirl. They sure did turn out awesome and took a hint of my Southern food craving away.

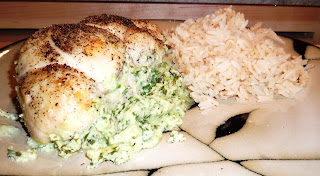
Not the best picture - but these were gooood!

1 large bunch or 2 small bunches of collard greens
3 or 4 ham hocks (you could use bacon if you are scared of ham hocks)
1 small onion diced
2 cloves of garlic minced
1 tablespoon of butter
salt and pepper to taste
16 cups of water (3 quarts)


Bring your water to a boil in a large pot. Add the ham hocks, garlic, onion, and salt and pepper. Turn to medium and simmer until they fall off the bone (1.5 to 2 hours).  In the meantime, make sure your collard greens are really clean - I soaked mine for several hours - change the water several times in between. Also make sure you remove the stems that run down the middle. Stack your leaves on top of each other (probably do about 8-10 at a time) and roll up. Cut into 1" pieces. Throw your greens into the pot with the butter and cover. Let simmer for about an hour.

I like to put a little bit of vinegar on mine when I eat them too. It cuts through some of the richness from the pork.

John liked these as well - I think it is because they had the hamhocks in them. Well, and he isn't that picky ;)

Enjoy!

Wednesday, June 27, 2012

Stuffed Chicken

A few years back, one of my girlfriends invited a bunch of our girlfriends over to her house for dinner. I was a little bit skeptical at first because I wasn't certain if this particular girlfriend of mine could cook. She said she was making stuffed chicken - which I assumed would be some sort of bread like stuffing - but turns out, it was stuffed with cheese. Well, if you know me and my love of cheese, you know this was a huge hit with me. So, out came the chicken in all its glory. Nice and golden brown with a ooey goeey cheesy center. Yep - it was delish. We had a great night that night - we ate, drank some wine, I did the heimlich maneuver on one of my girlfriends who was choking - you know, just your typical night. :)

Now that I have filled you in on that, this recipe is a tribute to my good friend Brittany who has been my good buddy since I was ten years old!


Cheesy Stuffed Chicken
  • 4 chicken breasts butterflied and pounded thin (about 1/2" thick)
  • 1 container part skim ricotta
  • 1 cup Italian style cheese
  • 2 large handfuls of fresh spinach leaves
  • 10-12 basil leaves
  • 3 or 4 cloves of garlic
  • 1 egg
  • Salt and pepper to taste

Lay your chicken breasts out flat and salt and pepper both sides generously. In the meantime, combine the rest of your ingredients in a food processor until fairly smooth. Scoop one (or two if you are me) scoops of the mixture into the middle of each chicken breast. Fold over and tie with kitchen twine. Back in casserole dish (yes, the cheese oozes out everywhere) at 400 degrees for 40 minutes.

It is funny how food can bring back such great memories. I hope you enjoy this dish!


Tuesday, June 26, 2012

John LOVES Steak

Can you tell? :)


I just thought this picture was funny!

I know - lame post. I will get back into the swing of things. Just super busy trying to wrap everything up in my final week of work!

Thursday, June 21, 2012

A Much Easier Way to Make Risotto

If you have ever made Risotto, you know it can be a complete pain. You seriously have to stir and add stock continually for over 30 minutes. It is definitely labor intensive in that you have to stand by the stove and just stir and stir and stir AND stir. I ran across this recipe as I was looking for new Risotto recipes since it is one of John's favorite side dishes and all. Basically, instead of making Risotto the traditional way and doing all that stirring, you throw the ingredients into a cast iron dutch oven and put it in the oven. GENIUS! It turned out really awesome too.


My method for making this was slightly different because I was so used to toasting the rice and what not before adding in the liquid. It still turned out really good though. Here is what I did:

  • 1 1/2 cups Arborio rice
  • 4 cloves garlic minced
  • 1/2 onion diced
  • 5 cups simmering chicken stock, divided
  • 1 cup freshly grated Parmesan cheese
  • 3 tablespoons unsalted butter, diced
  • 2 teaspoons kosher salt
  • 1 teaspoon freshly ground black pepper
  • 1 cup frozen peas
  • 1/4 cup half and half
Preheat the oven to 350 degrees. In the meantime, put your cast iron dutch oven on the stove top and heat to medium. Add in the butter. When bubbling, add in your rice, garlic, and onion. Toast until the rice just begins to brown stirring constantly (don't worry, this just takes a few minutes). Once toasted, add in four cups of chicken stock. Cover and put in the oven. My rice was done after 30 minutes, so make sure you check it - the recipe says to leave in for 45.

Once done, remove from the oven. Add in the one cup of chicken stock, the peas, half and half and parmesan and stir really well. Salt and pepper to taste.

See - that is much easier than trying to make Risotto the traditional way. AND it really did turn out to be just as good.

Tuesday, June 19, 2012

Big News

So....I have some big news! No, I'm not having a kid :) BUT after 8 years at the DATC, I have decided to pursue a new opportunity. Starting July 9th I will be managing a plastic surgery center in SLC. I have about a million mixed feelings, but overall I am super psyched! And I have no idea why this company chose me, but it is so awesome that they did! Woot woot! Huge promotion! Super excited!

Before you start thinking of all the procedures you would like done, this plastic surgery center is unique in that we only specialize in face lifts. Still...it's pretty sweet! And a little bit terrifying that i will be in charge. Yay! For the first six weeks I will be traveling and learning the ropes at a few other centers. Our little blog might suffer, but just hang in there!

Anyway, I thought I'd share the fantastic news. And of course, John took me out to celebrate last night...One of my fave's, Bonsai!


Well, I can only hope your week is as good as mine! I'm excited to start this crazy new chapter of my life :)

Monday, June 18, 2012

Weekend at the Cabin

This weekend we went to John's family cabin up at Brighton, UT. His grandpa built the cabin in the 1950's with hopes that it would be a ski lodge. Well, turns out it isn't a ski lodge, just a really fun place to spend the weekend. It is so relaxing to get out of the valley hike, fish, and cook up some yummy food.

Here are some fun pics from the weekend:

Lake Mary

hiking


Getting ready to do some fishing

The creek that surrounds the cabin


View from the deck


More hiking


I was pooped


Cute little flowers coming out of the rock

Ooohhh scary cliff

Sneaky little crow - poking holes in the garbage

Well, I didn't really think to take any pictures of the cabin itself. Oops! It is very nice though - John and his dad and probably some others remodeled the cabin in the early 2000's, so it is all up to date. I hope you all had a great weekend too and have a great week.

Wednesday, June 13, 2012

Buttermilk Fried Chicken

Speaking of fried things - who doesn't love fried chicken? If you know someone who doesn't, don't tell me because it will just break my heart!

I grew up eating fried chicken - whether it was homemade, from KFC, broasted, whatever - we never lacked in the fried chicken department. John loves fried chicken too and he grew up eating it as well. Ya know, it is just one of those staples!

Since I read quite a few food blogs, I see little tips and tricks all the time. One tip that I have read several places, is soaking your chicken in buttermilk and spices for 24 hour before breading it, makes the most moist, tender chicken. I have tried this several times and I will tell you, I will not make fried chicken any other way. It really is moist, juicy, and just down right delicious.


I tried to serve my deep fat fried chicken with at least something healthy.

1 pound chicken (again your choice)
1 cup buttermilk
salt and pepper to taste
egg wash
seasoned flour for dredging
vegetable oil for frying

Season your chicken pieces with salt and pepper. Place in a ziploc bag and pour buttermilk over top. Marinate in the fridge for 24 hours. 

Shake off any excess buttermilk and dunk your chicken pieces in flour, then egg, then flour again. Let rest for at least ten minutes before frying. Heat your oil to medium high. Place chicken in oil. The cooking time completely varies based on the chicken you use. Make sure all sides are golden brown and the chicken is cooked through.

Enjoy your clogged arteries :)

Tuesday, June 12, 2012

Crappy weather? Who cares!

So this weekend was not the best weather ever, but we made the most of it anyway. I think I am really ready for nice weekends though. None of this awesome weather during the week and crappy all weekend crap! Just nice pool hanging out weather!

SO....Friday, my friend Monica and I went out for a girls night. We got to get dressed up all sassy, which is always a plus!

Saturday, John, Monica, and I went to brunch then to the farmers market.

Sunday, John and I went with his brother and Whitney to the Park Silly Sunday Market. It was opening weekend and it was packed. Way fun though and some awesome live music.

Here are some pics from the weekend (not they are not in order because the blogger app sucks sometimes):


Thursday, June 7, 2012

The BEST Breakfast EVER! Chicken Fried Steak

Man, oh man, I love chicken fried steak. I think I started loving it the first time I ordered it at my grandparent's cafe. It is just so good. Crispy fried goodness, with some yummy gravy on top. When I used to order chicken fried steak at The Cafe, it came with a brown gravy. Over the last few years, I have served it with a country (white) gravy with some sausage chunks mixed in. I am not sure which I prefer - I know technically one is country fried steak and the other chicken fried steak - but either way, they are both delicious!

I don't know how many times I have said this, but I just don't love breakfast. So, anytime I can have something for breakfast that I would eat for dinner too - it is a BONUS! This is definitely one of those meals for me. John prefers his with eggs - me, not so much. Just some good old hashbrowns and the day I made this I just happened to have a watermelon laying around.


  • cube steak - pound super thin
  • seasoned flour for dredging
  • egg wash
  • vegetable oil for frying
  • whatever gravy you want

Take your cube steak and dip in flour, then egg wash, then flour again. Let rest for at least 10 minutes before frying (this helps keep your batter on). Fry on medium high heat until golden brown on all sides and cooked through. Top with gravy and enjoy.


Tuesday, June 5, 2012

Camping Smith and Morehouse

We went camping at Smith and Morehouse this weekend. It is a super great place that is about an hour from our house - yes, super close -  but it is secluded and mountain-y and just downright relaxing. I actually didn't even get cell phone service, which I admit makes me have anxiety a little bit, but it was really nice to just relax. The mountains are so green this year and just beautiful. Ahhh it was nice!

We got there Friday afternoon and the weather was great - I thought it was going to be so cold, but it was nice. John and I set up camp and did some fishing. Our friends Monica and Eric joined us later that night. Saturday we woke up to a big old cloudy mess. SO...we hung out at camp, made some yummy breakfast, and just waited for the storm to pass. It soon did and we went over to the little lake for some more canoeing and fishing. This was soon interrupted by a crazy rainstorm. I mean, it just started pouring! We had canoed across the lake, so we were kind of stuck. It was raining crazy hard and we had to make three or four trips back across the lake to get all our stuff back to the truck. Yep, it was an adventure to say the least. We were soaked, cold, and muddy, so we dried off and just hung out at camp... OH and ate some more. It seemed like the only logical thing to do :) Saturday night cleared up and John was able to get in some really good fly fishing. Then the weekend came to an end...we woke up early Sunday and headed home. It was hotter than HELL on Sunday in SLC, so we opted to stay inside for the day. What a great finish to the weekend.

Here are some pics from camping:

Pretty view

John's new Camp Chef


New tent!


Just hanging on a log


Tin foil dinners! YUM!


He loves these mitts a little too much!

Just heading to the bathroom in the dark

FANTASTIC view

John looks naked...he's not!


Shake your groove thing  :)

Stinking clouds


Eric needed a snooze!