Wednesday, April 25, 2012

Crock Pot Trial and Error

I don't use the crock pot very often, but am always intrigued by the one pot wonders people come up with. I mean, I will use it for pulled pork or pork/chicken tacos or a roast or two, but that's about it. When I came across this recipe for Beer Crock Pot chicken, I was intrigued. I mean, check out that picture. It looks nice and brown...like it has crispy skin...and the description - fall of the bone - come on, sounds fantastic, right?

Well, it was...EVENTUALLY anyway...after some serious doctoring! I pulled the chicken out after the cooking time, and it certainly was fall of the bone, but the skin was disgusting looking. It was more or less like boiling chicken with the skin on and getting that gross fatty skin. I was not about to eat that skin, so I thought of a few soultions. 1. I could throw it under the broiler and crisp up the skin or 2. I could not dirty another dish and chuck it on the BBQ. I opted for the BBQ. After a few minutes of grilling on each side, the skin crsiped up, the chicken was still fall off the bone, and I was much more pleased. I will definitely have to experiment with this recipe more though to get it just right.


  • The equivelant of 1 whole cut up chicken thawed - I just used thighs and legs
  • 1 can of beer (you could use chicken stock instead or even apple juice)
  • Salt and pepper to taste - I used a very generous amount
  • 4 cloves of garlic minced
  • 1 small onion sliced

Add your sliced onion and garlic to the bottom of the crock pot. Season with salt and pepper. Season your chicken with salt and pepper (be generous) and place on top of your onions and garlic. Carefully dump in the beer, so you don't remove all the seasoning. Turn crock pot to high and cook for 2 hours. Turn to low and cook for an additional 3 to 4 hours - up to 5. Remove chicken from the crock pot and let sit for about 10 minutes. Crips up the skin on a BBQ grill - turn heat to medium and cook on each side for just a few minutes.

I also made a gravy from the leftover cooking juice. It was way great. Just remove your chicken, whisk in about 2 teaspoons of cornstarch mixed with a little bit of cold water. Turn the crock pot up to high, adjust the seasoning as needed, and in about 20 minutes,  you will have a yummy beer gravy with little chunks of garlic and tender onions. YUM! You can do this process while you are grilling your chicken.

Tuesday, April 24, 2012

Seafood Boil and weekend project

I have always wanted to do a seafood boil, but just haven't gotten to it yet. This weekend seemed perfect...the weather was awesome...we could sit on the patio...what more could you ask for. I didn't do very well at taking pictures because I was too busy visiting, but you get the idea :)

John is thrilled - oh wait, he hates seafood!

mussels and clams

potatoes and corn
 
shrimp

spicy sausage

Toby and Amy - Cash was on the floor in his little seat, so I didn't get a pic

Monica and Eric

Monica and friend

Eric with corn in his teeth
It was a great night - but let me tell you, seafood boils are a lot of work. If you have ADD, you should not attempt this since you are constantly adding stuff, taking it out, etc. Here is what I did.

  • 2 - 49 ounce cans of chicken broth
  • 5 bottles of beer (optional - just replace with other liquid)
  • Water - so the seafood or whatever is in the pot is fully covered
  • 1 bunch of thyme and rosemary tied together
  • 2 large onions quartered
  • 10 cloves garlic smashed
  • 1 bag crab boil seasoning - I think I would use two next time
  • 1 teaspoon red pepper flakes
  • 2-3 teaspoons kosher salt
  • 4 pounds mussels and clams cleaned and for the mussels debearded
  • 2 pounds shrimp (you can use shell on or off - just make sure the mud vein is taken out)
  • 4 ears corn cut in half
  • 10 large red potatoes quartered or halved (just so they are easier to eat)
  • 2 jalapeno kielbasa sausages
  • Garlic butter and parsley for topping
  • Crusty bread for dunking

Add the first nine ingredients to a large pot and bring to a boil. Put your potatoes in a basket and put in the pot. Cook for 30 minutes. Add in the corn and cook for 5 minutes. Remove from the pot and set aside. Place your shrimp in the basket - watch them close. When they are a nice pink color (about 4 minutes) remove from the pot and set aside. Place your mussels in the basket. Place in the pot and cook for 4 minutes. Add in the clams. Cook for an additional 4 minutes. Remove from the pot. Top seafood with a generous amount of garlic butter and chopped parsley and dig in. You could also serve that on the side - I just put it on though.  I got some of the juice form the pot and dumped it over the mussels and clams too - that way you can actually use the bread for dunking.

As for the sausage, I didn't want to boil it, so we threw it and some chicken on the grill. I liked it much better that way! Pretty much you can do any kind of seafood you want with this recipe - lobster, crab, whatever you want and is available. The broth was really good - especially with the rosemary, thyme, onion, and garlic.

As for the rest of the weekend, we worked on a little project. We had a space in our little back yard for a garden, but after four years of trying - nothing grows in it. I mean nothing! There just isn't enough sun and the dirt sucks. So, we decided to get some pavers and just fill it in. I like it better and it gives us just a little more space. We just put the BBQ on it, so we can add a bench or something where it was so we will have a few more seats on the patio.


John working hard - those suckers were heavy!!

tada!
I hope everyone had a great weekend and has a great week too!

Friday, April 20, 2012

New Breakfast Idea - Breakfast in a Tortilla Bowl

I have mentioned this time and time again: John loves breakfast...or as he says "brea-fas" - just drop the k and the t and you are set - and I really don't like breakfast or "brea-fas" for that matter. Now, when I say really don't like...I mean if I never had to eat it again, I would be just fine with that. Since I am an extemely nice person - yes, extremely nice - I am always thinking of creative breakfast ideas. Who does that? I hate breakfast so I try and think of fantastic breakfast ideas? I guess I must really like John ;)

I have made breakfast tacos, breakfast burritos, breakfast tostadas, etc. but I had an epiphany, I have never made breakfast bowls - you know, putting breakfast inside one of those baked taco salad bowls? Hmm...what an idea! I was feeling pretty genius for that one!


I mean, look how good it looks. And here are a few things that went into making these.


Breakfast postatoes with onions, bacon, and jalapeno
 
Just some plain old spicy sausage

Oh and John recovering on the couch after eating his large breakfast bowl. I bet he appreciates all these pictures that I post of him...don't you? :)


These are actually really easy to make. You can either bake your own bowls using the uncooked tortillas and the metal forms or buy them pre-made. Fill with whatever your heart desires. We did sausage, potatoes, eggs, then topped with cheese, sour cream, cilantro, jalapeno, tomato, and onion. You could also do seasoned black beans, potatoes, roasted jalapenos or chilies, eggs, and then whatever garnish you want. I mean, there are a lot of possibilities. You can just run with it. So, there you have it - breakfast in a tortilla bowl.

I wonder how long it will be before I have another good breakfast idea. As you can see John looks miserable because he was so stuffed. It definitely was a hit!


Thursday, April 19, 2012

Great Soup Weather

Well, it has been pretty rainy the last few days, which equals great soup weather. I really do love soup, so I guess I better live this weather up because soon enough it will be scorching and that just doesn't make soup sound appetizing!

 
I was looking for a new soup recipe - you know - since I just mentioned I love it so much, when I ran across this recipe for Spring Minestrone with Chicken Meatballs. It looked pretty good, except I wanted to make more of an Italian-y style meatball, so I went with ground turkey versus the chicken because I could use a combo of plain ground turkey and the Italian seasoned ground turkey.

 
Here is the finished product - I may have made my meatballs a little too big!


Meatballs - I made way too many, so you could cut this recipe in half or freeze them
  • 1 pound ground turkey
  • 1 pound Italian style ground turkey
  • 1/2 onion finely diced
  • 4-5 cloves garlic minced
  • 1/2 cup panko bread crumbs
  • 2 eggs
  • 3/4 cup shredded Italian cheese
  • 1-2 teaspoons Italian seasoning (Use as much as you like - I like a more robust flavor, so I use more)
  • 1/2 teaspoon red pepper flake
  • Salt and pepper to taste

 
Mix all of your ingredients in a large bowl - do not over mix. Form into 1/2" to 1" diameter meatballs. Place on a baking sheet and bake at 400 degrees for 20 minutes. They should be nice and brown on the outside with some cheese oozing out.

 
Soup - in the meantime, put your soup together
  • 1 onion diced
  • 3 stalks celery diced
  • 4 carrots diced or sliced
  • 1-2 zucchini diced (depending on the size)
  • 10 leaves basil - chopped into ribbons
  • 2 cups fresh baby spinach
  • 1 cup small pasta
  • 1 can kidney beans - drained and rinsed
  • 6-8 cups chicken stock
  • 1 teaspoon Italian seasoning
  • salt and pepper to taste

 
In a large pot, cook your onion, celery, and carrots until the onion is translucent. Add in your meatballs, Italian seasoning, salt and pepper, kidney beans and cover with chicken stock. Let cook for at least an hour. About 30 minutes before you are ready to serve, add in your pasta. Stir pretty consistently to assure it doesn't stick to the bottom. About 15 minutes before serving, add in your zucchini. Right before serving add in your spinach and basil and cook until just wilty. Serve with some grated Parmesan cheese on top and crusty bread.

 
I may have missed the "Spring" part, but it sure did turn out to be good soup. It seemed light - minus my gigantic meatballs.

Wednesday, April 18, 2012

The Fondue - yes, it deserves a The in front of it!

Now that I am all caught up on everyone else's blogs, I am going to write my own!

Life feels like it has just been absolutely crazy lately. At work I feel like I am always playing catch-up and when I get home I feel the same way. There just aren’t enough hours in the day to get everything done.  Well, maybe there are, but I do think I deserve at least a couple of hours of sleep! :)

Sometimes I just need to take a deep breath and RELAX. But we all know it just isn’t in my nature! I like to keep busy - so, what do I do instead of relaxing? Cook of course - well, and have people over - etc. Yeah, it is almost the same as relaxing. I mean - they go hand in hand ;)

I have said this before, but I will say it again, fondue is one of my favorite things! AND pretty much now that the Bieber has endorsed it in his latest song “Swag swag swag, on you
Chillin by the fire why we eatin' fondue” (what, what!!) it is going to be all the rage with 12 year olds! Yes, they will think I am hip after all! ;) hahaha!


Oh yeah…so in an attempt to relax, we had some friends over fondue. It did help with the relaxing because fondue makes everyone happy and we all had a blast!


Oh yeah, fondue - I did post about it awhile back - just click here. I did not include any details though, so here they are! You can be so creative with fondue. Here is what I did:

  • Onion
  • Zucchini
  • Yellow Squash
  • Potaoes - pre bake and season with salt and pepper or something yummier like rosemary and garlic salt
  • Green beans
  • Mushrooms with the stem taken out
  • Steak - seasoned with garlic salt and pepper
  • Pork - marinated in teriyaki sauce
  • Shrimp (peeled and deveined) - marinated in spicy chili garlic sauce
  • Chicken - marinated in Stubbs chicken seasoning
  • Tempura batter
  • Cream cheese and regular cheese for stuffing your mushrooms (Holy crap you must try this if you haven’t)

Cut all of your items into 1”-1.5” squares. Season and marinate your meats. Whip up your tempura batter. Have your cream cheese (I use the flavored kind either the chive and onion or the garlc one) and cheese available (you know, just put them in a little container).

OK - so now the fun begins. Heat your oil - yes, I use oil - according to your fondue directions. Once heated start dipping in your stuff. Meats are good on their own - just dip them in and eat them. Make sure to kind of shake off any excess marinade though, so it doesn’t spit in the oil. As for the veggies, dip them in the tempura batter and fry them up. Holy cow - they are so awesome. AND for an extra special treat stuff your mushroom with cream cheese and cheese them dunk in the tempura then fry! These suckers are hot, so watch your mouth, but they are so good.

Well, there you have it. My relaxation. And yes, you can make a healthy version of fondue, but that didn't sound relaxing to me :)

Monday, April 16, 2012

John’s New Favorite Meal

I really didn’t think it was possible, but John told me he had a new favorite meal. I mean, I thought steak, steak, and more steak would always be his favorite, so this news threw me off just a bit.

John is always wanting to eat breakfast for dinner. As I have stated time and time again, I really don’t like breakfast. In fact, I always try to make breakfast food that doesn’t taste like breakfast. I seriously eat cheese and jerky for breakfast most days….yeah, you get the picture. I just don’t love it.

Back to the story. John asked for breakfast for dinner. I just rolled my eyes and started in on how much I dislike breakfast…ya di ya di ya di ya di…then I stopped. Hey, I can compromise! I was thinking about making patty melts anyway, so I thought I could probably just go ahead and throw an egg on his - you know, breakfast patty melts - then I could also serve some hash browns along side. Yep, it worked…John was happy….I was happy (because I didn’t make mine a breakfast-y type meal) and apparently, this became his new favorite meal.


Here is what went into this manliest of man sandwiches:
  • 1 hamburger patty
  • 1 slice cheese - cheddar, Swiss, provolone, whatever you like
  • 1 over easy egg
  • Grilled onions
  • 1 tablespoon thousand island type dressing (I throw some ingredients together - mayo, ketchup, lemon juice, sweet pickles, salt and pepper, a little bit of hot sauce, etc. to make my own)
  • 2 slices of bread toasted - choose your favorite kind
  • If you are John - you also stuff some of the hash browns inside of the sandwich too

Cook your hamburger and melt the cheese on top - you can pan fry, BBQ grill, whatever you want. Assemble your sandwich by slathering the toasted bread with the thousand island dressing. Place the hamburger on the bread first, then top with the egg, grilled onions, and hash browns.

Yeah, it is a pretty manly sandwich. As you can see, I went a different route for my dinner. It worked too. No bun, no egg, etc.


John also made a rendition of this creation for breakfast. Substitute the toast for an English muffin and the hamburger for sausage and there you have it. Breakfast patty melts!

Thursday, April 12, 2012

Grilled Wings

If you read this blog on a regular basis, you know that John and I love wings. This is John loving wings :)


I started loving wings at a young age. I remember my mom would bust out the fry daddy and fry up some whole wings - with the weird little tip and all. I looked forward to this so much and didn’t even mind that my clothes smelled like a big grease bomb afterwards. Well, I sort of did mind, but I dealt with it so I could eat the wings!

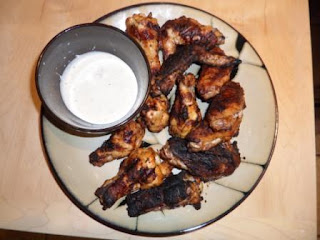
Over the years, I have found that I particularly like dry rubbed wings. The saucy work too, but I would rather have a spicy dry rub. I don’t know why I told you that piece, because I am not writing about dry rubbed wings…I guess it is jus FYI ;) In an attempt to not make my house stink like a fast food restaurant and to make wings a little bit healthier, John and I will often grill/BBQ wings. This method really does make the wings taste great and you can have fun with the flavors. For example - sriracha garlic grilled wings…tada!


  • 1 pound wings (whole cut up - doesn’t matter)
  • 4-5 tablespoons sriracha (enough to generously coat the wings)
  • 3-4 cloves of garlic
  • ½ to 1 teaspoon red chili flake
  • Cayenne pepper (to taste)
  • Salt and pepper (to taste)           
  • Ranch or blue cheese for dunking

Place your wings in a large Ziploc bag. Dump in all the seasonings. Shake it up and let marinate for at least 2 hours - up to 24 if you have the time. Turn your BBQ grill to medium and let it heat up. Grill your wings for approximately 20 minutes turning every 3-4 minutes. Yes, they really need 20 minutes - if not, they are way too chewy.

How simple! Now, have fun with your flavors. If you aren’t into spicy, just use your favorite BBQ sauce…you could also try something like teriyaki or even a sweet and spicy blend with soy sauce, brown sugar, and red chili sauce. The possibilities are endless with these wings. Have fun and get creative.

Tuesday, April 10, 2012

Greek Style Chicken and Salmon

Do you ever just get sick of the same old same old? I sure do. I have set meals that I make and I really have to stretch to get out of my cooking comfort zone. I mean when I like something, I like it and I just seem to make it again and again and again! For example, when I make salmon, I always make blackened salmon. I like the flavor and it just works for me. SO, after having the realization that I only make blackened salmon, I got an itch to try something new. I have been meaning to make some sort of Greek inspired dish lately, so I thought I would make my salmon using a Greek rub of sorts. As you know, John does not like salmon, so he got chicken instead. Both were really yummy!


You can use this marinade on chicken or salmon (I would say it is enough for about ½ to ¾ of a pound)

  • 1 teaspoon dried oregano
  • 1 teaspoon dried basil
  • 1/2 teaspoon red chili flake (optional)
  • 2-3 cloves garlic minced
  • 1 lemon juiced
  • ¼ cup of olive oil
  • Salt and pepper to taste

Mix all ingredients and pour over the top of salmon or chicken. Marinate for at least 2 hours. Prepare by broiling, pan searing, or simply throw on the BBQ grill. You can serve your chicken or salmon in a grilled pita pocket with a yummy tzatziki sauce like the recipe found here.

Monday, April 9, 2012

Viva'd Las Vegas

Well, we just got back from Vegas. It was such nice weather. I didn't do a great job at taking pictures, but here are a few.


And now, back to the grind. I think I need another vacation :)

Saturday, April 7, 2012

Grilled Oysters - oh yeah, this dish was not for John

Don’t worry though…he had steak :) Yes, this awesome steak covered with bacon, peppers, and onions.


I used to hate oysters, and apparently John still does, but now I have learned to love them. When I was little, I would get extremely sicked out by my dad and my sister when they would make some oyster stew. I mean, sick!  Oh wait, I am over it now and do enjoy a good oyster stew :)

Oysters, oysters, oysters…I don’t like them raw so much, but Oysters Rockefeller and grilled oysters are just A-OK! Let’s be honest, they are a little slimy, but they sure do taste good!

A few months ago, we were at John’s brothers house for dinner. They had some oysters and decided to throw them on the grill. I was so intrigued by this method. Could it really be this easy to make oysters at home? YES! And yes, I really am excited about it!

Basically, you take oysters, place them cup side down on a hot (high heat) grill for a few minutes (the larger the oyster, the longer it takes - these little kumamotos opened up in like 4 minutes), and let them open up. You still have to shuck them to get them open all the way, but even having them pop open that little bit helps out a ton!  Once the top shell is removed, top each oyster with a little bit of hot sauce and some melted garlic butter.


Here are a few notes:
  • I have purchased oysters from a wholesaler here in SLC and from the Market Street Fresh Fish market. Either way, make sure your oysters are fresh. Basically, they should have been picked and shipped within a day.
  • When you get them from a wholesaler, they are not cleaned. They are actually quite gross. You have to scrub the shells. If you get them from Market Street, they are cleaned. They are more, but you don’t have to clean them.
  • If an oyster doesn’t open up on its own with heat, don’t eat it.
  • If an oyster is opened before you put it on the heat, don’t eat it.

I think that covers it. Eat some oysters…they are good for you :) Although John's face says something different :)

GOOF!!!